Nico Wouterse is no stranger to anyone in the Quartex community and have been with us since the project’s inception. He has worked quite closely with LLM technologies the past few years, building his own design library and design principle framework.
We are presently at the cusps of finishing both our roadmap steps, and one of the points on the next roadmap – is a command-line compiler. Both for Linux, MacOS and Windows (covering both x86 and ARM).
When that becomes available it should make QTX a dream for people generating projects using AI, invoking the command-line compiler to build the final product.
We could even look at licensing options for no-code websites that wants to use QTX as their back-end, spinning it up in containers to do the heavy lifting for their own no-code product.
Anyways – head over to Nico’s! He also has other booklets that could be of interest!
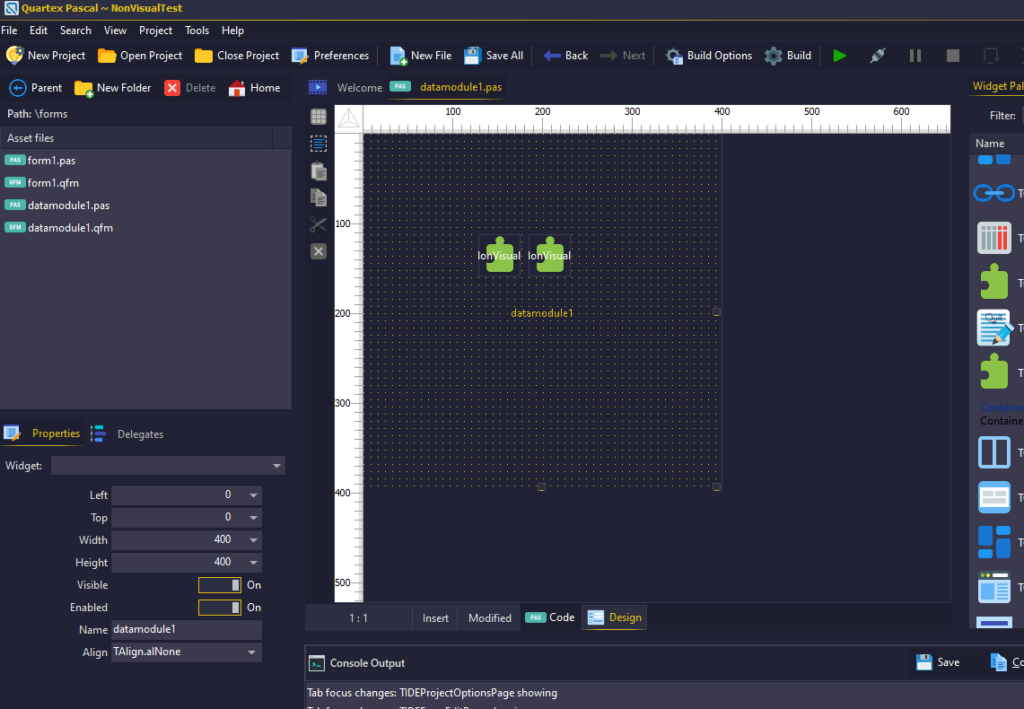
In the previous post I talked about our support for non-visual components. This is now in place and I moved on to the next ticket on our list: datamodules! And we already have this working!
Datamodules changes everything
For those coming from Delphi, C++Builder or Lazarus – datamodules need no introduction. It allows us to quickly drag & drop non-visual components together which at runtime becomes a complex object structure.
Datamodules are now operational! I need to make the form designer more aware, as it creates a few properties that is strictly not needed for datamodules (left, top, width etc). So we should have everything ready in our next update!
While this is ‘old news’ for native languages, it is actually entirely new for the world of JavaScript. And it really comes into it’s own under Node and Deno (server side programming).
Node made easier
Node is what people use to create servers or local system-services that are platform agnostic and async in nature. The non-visual nature of the many modules and packages that Node servers are made from – makes it difficult to create any form of visual tooling for it.
This is where Datamodules come in! All those fancy classes we have created for NodeJS can now be elevated to TQTXComponent and registered with the component palette. That way you can drag & drop servers and non-visual classes just like you would in Delphi or C++Builder.
We can also introduce new project types where datamodules are created automatically by the application object (just like visual applications), which ties in nicely with the existing project build-config. This also applies for the library project type and should turbo charge creating complex libraries that can be consumed by JS developers.
Up until now the form designer in Quartex Pascal focused purely on visual controls. But as the IDE matures -more and more features common to RAD development is surfacing. Non visual components is finally supported by the IDE and package manager!
Non-Visual Components
In traditional development systems such as Delphi, C++Builder or Visual Studio -non visual components is a species of classes that the form designer can manage and visually represent. Technically it is the same as creating a class by code, but being able to drag & drop such objects side by side with visual controls, makes them infinitely useful.
Typical non-visual components are things like database connections, table or field bindings, image lists, event producers and config options. In most scenarios these non-visual objects are connected to a visual control through property assignments.
Same methodology
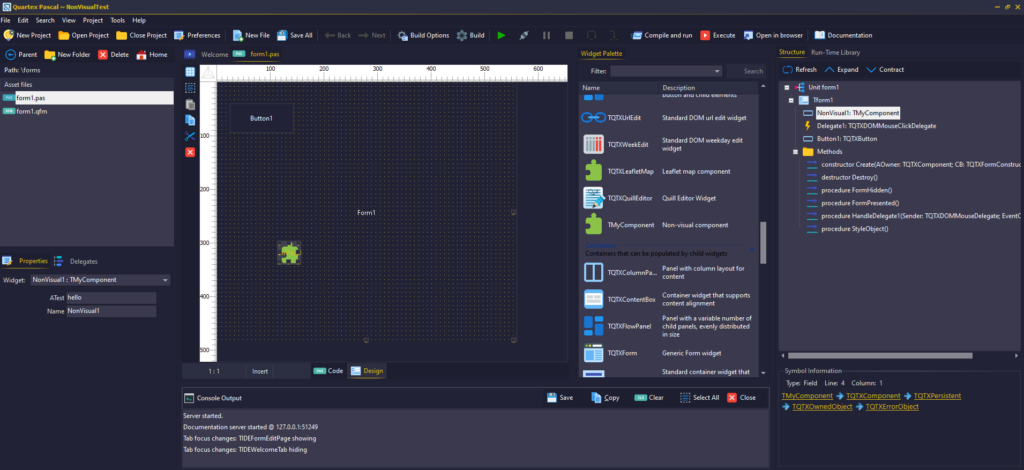
From the viewpoint of the IDE a non-visual component is the exact same as a visual control. It is registered and handled by the same internal mechanisms, and likewise created and destroyed alongside it’s visual siblings. The only difference is that they inherit from TQTXComponent rather than the DOM specific TQTXWidget.
You can now drag & drop non-visual components onto your forms!
This also means that TQTXComponent does not manage the life-cycle of a HTML5 element. There is no Handle property that reference any elements in the DOM or the NodeJS runtimes (unless the component is written that way).
You likewise use a non-visual control in the same way you would a visual one. You drag & drop the component on a form, change it’s properties using the property inspector – and that’s all there is to it.
Datamodules
The next task is to introduce datamodules. You can think of datamodules as a non-visual form. Much like TQTXComponent a datamodule does not manage any visual elements, it is purely a construct for organizing non-visual components.
In large applications with many forms where you want to share resources, such as images or a database connection – it is common to isolate these components on a global scope datamodule. Instead of each form having it’s own copy of said components, they all share one instance via a datamodule.
Perfect for NodeJS or Deno
Datamodules will revolutionize building Nodejs applications. This really is the missing link for RAD (rapid application development) server-side application building.
You will be able to drag & drop server components, database connections, communication protocols – and setup a complex server infrastructure in no time. Non-visual components and datamodules reduces tedious scaffolding to minutes rather than hours or days.
This is exactly why Delphi is so popular for building desktop applications.
Ragnarok communication protocols
With non-visual components under wraps, it will be possible for us to isolate different communication protocols as self-contained entities that you can drag & drop. So anyone can design a message protocol and emit it as a reusable component.
The IDE currently emits protocols as stock classes. This can soon be elevated to components.
Imagine dropping a Websocket server on a datamodule, then dropping a ready-to-use filesystem protocol component, then an identity protocol component, and finally a chat-room protocol components. Once the protocols are attached to the server object -the server will instantly support the message-types these protocols export. Each protocol can contain hundreds of messages.
We can also isolate the wealth of Nodejs modules as drag & drop components. Features that would otherwise require time consuming manual work.
Update
A new build will be available shortly! We are hoping to have the update out this weekend with support for non-visual components. It will take some time before we can offer a rich palette with ready to rock objects, but knowing our community I dont think it will take too long before they appear in the wild 😉
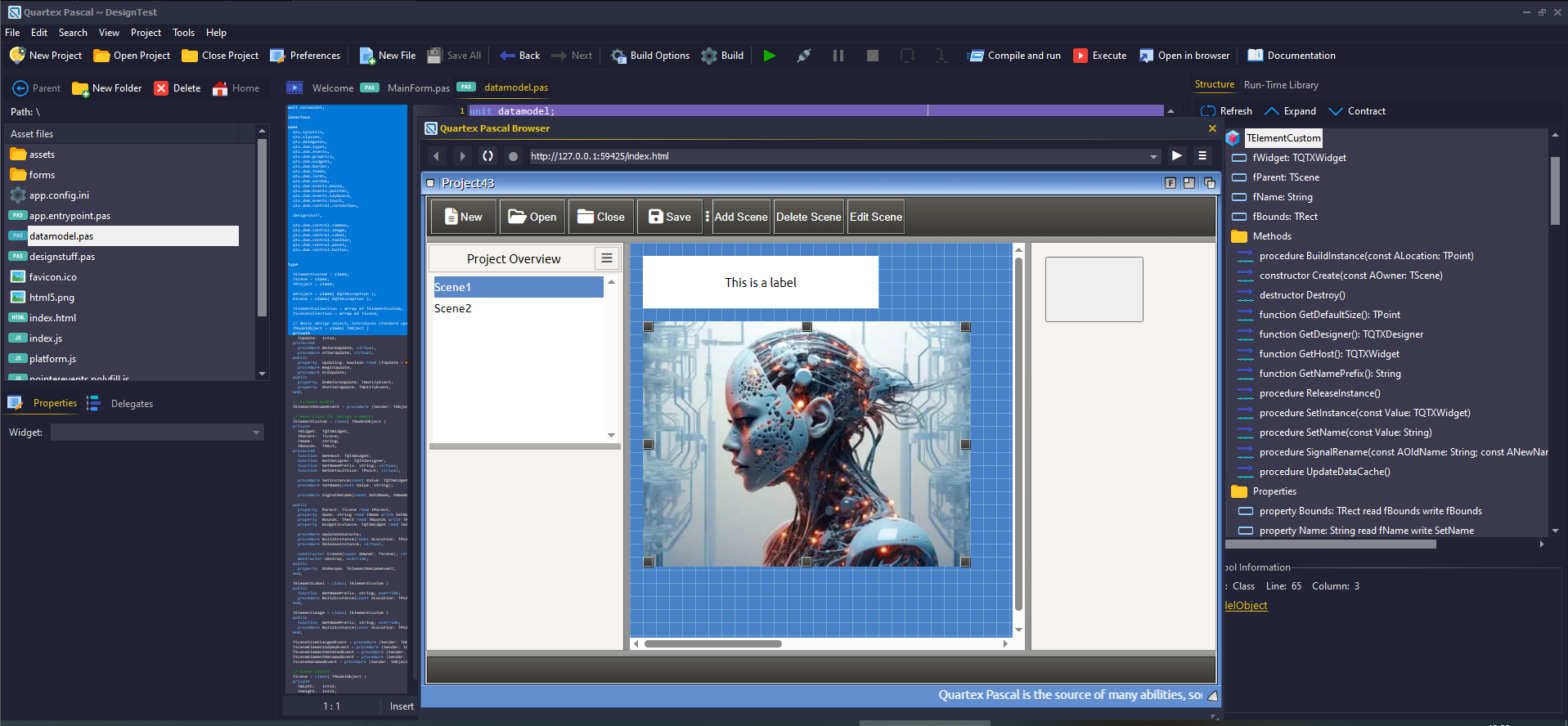
A small bug was discovered in the treeview on the main form that contains the Run-Time Library file overview. After downloading and updating to the latest packages – the items still retained references to the previous packages prior to the update.
This sadly caused an access violation if you began navigating the treeview before clicking “Refresh Runtime library files” from the tools menu.
We noticed this and fixed it immediately
This was an oversight on our part as the RTL treeview should be automatically refreshed when the package-download form closes.
This has now been fixed.
Windows Defender false positive
Quartex Pascal is written in Embarcadero Delphi, which has been the favorite language used by hackers for a long time. This has the downside that a lot of virus killers (Windows defender included) can mistakenly flag executables created in Delphi as containing a malware (trojan usually).
This is because Virus killers scan for unique signatures (hash mapping) inside executable files, looking for specific signature matches – and thus picks up on chunks from the Delphi RTL which has nothing to do with any malignant code.
In other words, most virus killers blindly compare against digital footprints which also exists in harmless applications. It’s like flagging paw prints as bad without checking if its from a tiger or golden retriever.
This is well documented case (see links below) that sadly affects a lot of software out there. There is absolutely no trojan code in our executables. Our build server runs on Linux as well, and our back-end has two separate security systems as the binary travels from the compiler to our installer build process.
Both executables that ship with our installer, the IDE and the update executable (which restarts the IDE after updating the main program) are signed with a commercial certificate – and there is simply no malicious code in our repositories. Everything is built from scratch on Linux, there is no way for a process to attach itself to a fresh binary like it could do on Windows.
So you can safely mark the executables as safe, telling Windows defender to ignore these.
The use of UPX
Many developers use a popular exe compressor called UPX. This takes your executable and compress it, basically creating a new exe file with the decompression code included. So when you start this program – the original application is decompressed into memory and executed.
While we doubt this has any effect on the issue we mention above, we have decided to stop using it. Just in case that can cause Windows Defender to overreact. There is nothing wrong with UPX and it’s been in use for decades by developers everywhere – so it’s doubtful that this will have any effect.
Either way, just to make sure we do what we can – its no longer used.
Get the latest update
Update or download the latest executable from our download page!
The changes to this version are massive, but most of the work is not really visible since it involves a complete refactor of our codebase to Lazarus (read: making it possible to compile with Lazarus on ARM, we still very much use Delphi).
Plenty of RTL changes and updates, including the new TQTXStringGrid widget
We hope we have managed to fix most of the hiccups people have experienced, and we will of course continue to polish and add more and more features according to our plans and roadmap.
Full reinstall?
Technically you can just update your packages and exe from the update window, but since the new TQTXImage breaks demo code I strongly urge you to download the installer and do a re-install. The new demos for things like the string-grid and layout unit is a part of the installer.
Changelog
Removed registration of old grid-layout widget, as well as example (now deprecated)
Fixed a problem with the css selectors in TQTXContentbox
Fixed issue with TQTXLabel not vertically centering due to css selector typo
Minor fix of TQTXLabelContent constructor
Updated TQTXToolbar quite heavily with overloads and methods for easily setting up buttons
Minor adjustment to TQTXSize
Updated the sqlite3.js driver
Refactored and fixed issues with the sqlite3 DOM driver
Minor adjustment to DB framework (connection pool etc)
Added TInt32.PercentageOf() method to RTL
Moved application object reference to unit level, avoid circular reference which left the app object in memory after unloading an app at runtime
Simplified the Alpha blending (and fixed wrong math where the exponent was left out)
Implemented full text-metric for TQTXFont, it is now possible to measure the width/height of a string with a single call
Implemented TQTXTable widget with full wrapping of the HTML5 table element (including the new header, body and footer constructs)
Implemented TQTXStringGrid widget with support for column editing
Implemented new and fancy Layout unit, making it a snap to create complex layouts by code, perfect for dialogs and quick form layouts
Implemented Marquee widget (scrolltext)
Rewrote TQTXImage which now contains the code that used to be in TQTXDomImage
Implemented TQTXImageBox, which contains the logic previously in TQTXImage (sigh)
Removed obsolete units from the Patreon days, which are now a part of the RTL
Added example for the StringGrid
Added example for the layout unit
Fixed bug in CSSClassRemoveEx() method for TQTXWidget
Fixed an issue of Paint() not being virtual in TQTXGraphicView
Minor changes to demos to make them compatible with the new TQTXImage widgets. This affected 3 demos which used them quite extensively
Went through all RTL units to get rid of hints and warnings (21 units)
Updated Phazer library with fixes to class fields
Fixed a blunder in TQTXORMObject
Fixed Node.js template files (8 files)
Fixed bug where WebView did not work if you started two instances of the IDE
Fixed issue where the property inspector sheet would not be repositioned during a resize
Fixed a massive issue with name qualifier being active on string properties in the inspector
Added support for https for node.js http server
Expanded back/next functionality in the IDE (history navigation) to handle positions in editor as well as widget selections
Full adaptation of the our codebase for Lazarus / Freepascal
Created our own proxy widgets to make porting easier
Recompiled QT for Linux and Mac from scratch, our codebase now used QT for all platforms (not yet released)
Fixed missing attribute read/write in TQTXListView
Adapted several parts of DWScript to better suit our needs.
Added Select All, Select None, Select RTL options to the popup menu in the package-download form, makes it easier to quickly selected all items etc
Full update of the HTML documentation in the IDE, with substantial changes and more info
Fixed issue with color selection in the inspector not being persisted in the Background and Border properties
In the Quartex Pascal RTL we support both traditional pascal events, like people are used to from Delphi or Freepascal, as well as delegate objects native to JavaScript. Most widgets exposes standard events like OnClick when it’s useful, and if you need more specific event handling you can attach a delegate for it.
Delegates?
A delegate is an object that represents your event-handler, the procedure that should be executed when the event fires. The benefit of a delegate is that it allows you to attach as many handlers as you like to any given event. Internally in the JavaScript runtime when an event is triggered, it will traverse the delegate array associated with the event – and call each handler in sequence.
The JavaScript event model can look scary at first, but it’s really powerful once you get the hang of it
So you can attach 100 OnClick handlers to a button if you like, and they will all fire in the same sequence as you added them. This is very useful since you can attach to widgets from the outside rather than override methods or mess with the internal logic.
Delegate handlers are somewhat different in Quartex Pascal than you expect. We don’t shield you from the JS elements we have wrapped. Instead we have provided utilities that simplify working with these raw JS style handlers.
Let’s look at a pointer event (similar to mouse but works well on touch devices):
The important part in the above handler is the EventObj, which is the actual PointerEvent object from Javascript. We have painstakingly created a wrapper class for it (which is why it comes in as JPointerEvent) that allows you to work with the raw JavaScript object directly.
The most important property of any native JavaScript event object, is no doubt the target (and currentTarget) property. This contain the handle of the element you have clicked or interacted with.
Finding the instance
If you have created your own widget that maintains several child elements, you have two choices: either you attach a delegate to each child, which results in hundreds or potentially thousands of delegate objects being created. Or, usually more prudent, you attach a single handler to the widget itself (the container of the children) and then work out what child the user has interacted with.
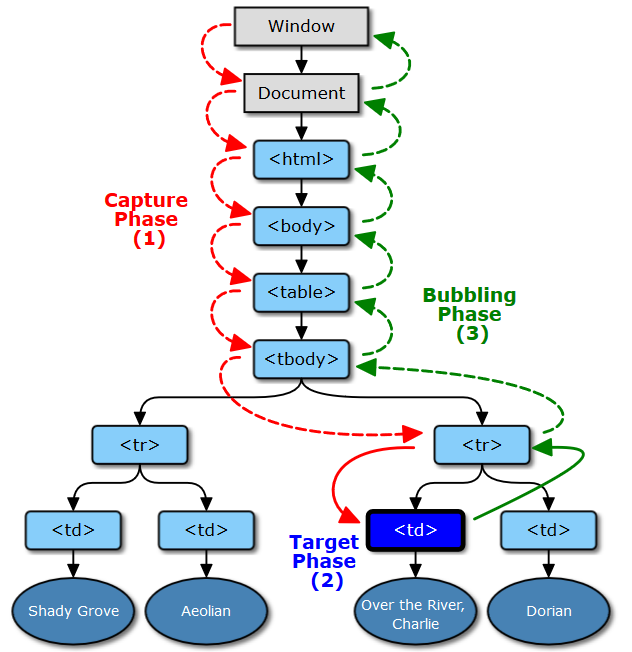
This works because JavaScript events bubbles upwards. So whenever you click anything, the event will first fire on the document, then trigger in the application display element, then the form, then panels or anything else beneath the mouse pointer (and so on). Think of it like a deck of cards where the event will fire starting from the card at the bottom – and bubble upwards toward the top. The current card is represented by the currentTarget property, while whatever you hit on that card (child) is referenced in the target property.
To find the widget instance (class instance) that a handle belongs to, we can use the GetInstanceFor() method of TQTXWidgetRegistry. Whenever a widget is created it registers itself there, exactly so its easy to do a quick lookup of a handle:
procedure HandleClick(Sender: TQTXDOMPointerDelegate; EventObj: JPointerEvent);
begin
  var lHit := TQTXWidgetRegistry.GetInstanceFor( EventObj.target );
  if lHit <> nil then
  begin
    writelnF("you hit %s", [lHit.Classname]);
  end;
end;
But what if you have child elements that you populate with raw html or images at runtime? Like I mentioned above the runtime keeps track of widgets you create (or that the application itself has created), but this does not cover raw html that you insert at runtime.
If i have a button as a child on my custom widget (just an example) and insert the following at runtime, those elements will be unmanaged by your application. They are not created as widgets, and thus there will be no registration for them:
So if a user now clicks the IMG element head-on, the target property will in fact point to the IMG element, not your button. And thus getInstanceFor() will return NIL. In this particular scenario the currentTarget propery will in fact point to the button, but we want to avoid such specific situation dependent code if we can.
Finding the owner
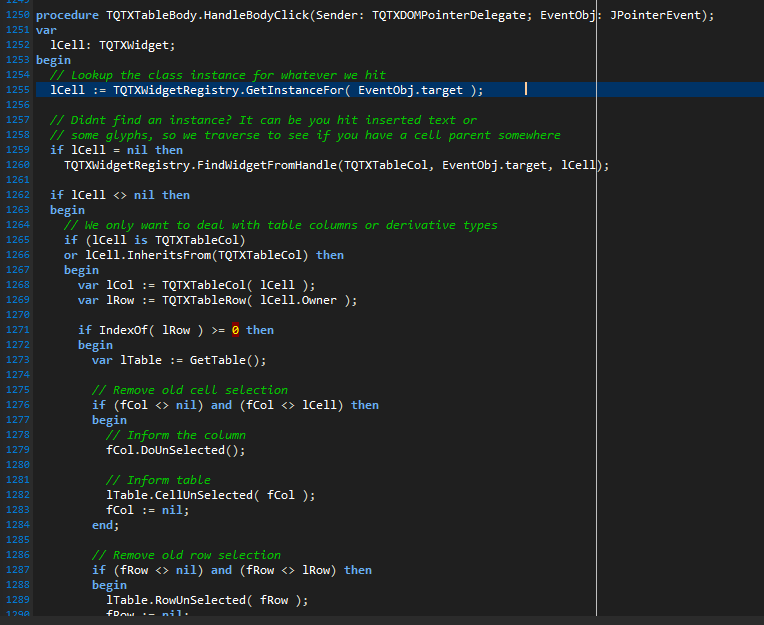
TQTXWidgetRegistry has another method that takes care of this, namely a function that will take any handle -then traverse backwards through it’s parents until it find a widget of a specific type – namely FindWidgetFromHandle().
So to mitigate cases where you (or anyone who use your cool new widget) have inserted raw html, you would do something like this:
procedure HandleClick(Sender: TQTXDOMPointerDelegate; EventObj: JPointerEvent);
begin
  var lHit := TQTXWidgetRegistry.GetInstanceFor( EventObj.target );
  if lHit = nil then
    TQTXWidgetRegistry.FindWidgetFromHandle(TQTXButton, EventObj.target, lHit);

  if lHit <> nil then
  begin
    writelnF("you hit %s", [lHit.Classname]);
  end;
end;
In the above code we call on FindWidgetFromHandle() and we specify that it should stop if it finds an instance of TQTXButton and keep that value (the third parameter is of type var, so the value is stored there when successful).
This obviously takes for granted that you know the types of child elements you manage. The benefit of custom widgets is that you already know what type of child elements you deal with. A listbox deals with listitems, a listview operates with listviewitems and so on.
You can implement more elaborate code that determine if an element is a direct child of your widget (and thus allowed) and then write more delicate handling to deal with edge cases. If you snoop around the RTL and look at how we have solved things there you will find quite a lot of it!
The new TQTXTable widget handles everything through a single, elaborate handler
Adopting a handle
There is also a final option when it comes to “alien” handles, and that is to adopt them! Yes you read that right, you can in fact absorb any element if you have a handle reference.
TQTXWidget which is the fundamental class for all visible controls have a few constructors you can pick from, including one that takes an already existing handle.
So you can in fact do something like this:
var lAlien := TQTXWidget.CreateByRef(EventObj.Target, [], nil);
In some circumstances it’s actually very useful to inject raw HTML, and then adopt the injected structure as a widget. It all depends on your needs.
The second parameter is a set type, with a few options you can tweak:
  TQTXWidgetCreateOptions = set of (
    wmStyleObject,
    wmBindToParent,
    wmUsePositionMode,
    wmUseDisplayMode,
    wmUseOverflow,
    wmUseBoxSizing,
    wmUseParentFont,
    wmUseTouchAction,
    wmUseVisibility,
    wmAutoZindex
    );
These options enable or disable what should be applied to the handle. wmStyleObject will execute the StyleObject() method as a part of the constructor, Using wmUseParentFont will apply the parentfont styling to the widget and so on. In most cases you wont apply any of these as that would affect how the adopted element is styled.
Do keep in mind though that adopted widgets will not manage the element’s life-cycle like ordinary widgets. Since the element was not created by TQTXWidget, it will not destroy the HTML element it manages when the destructor executes.
The holidays is a perfect time to enjoy some quality coding. The stress leading up to Christmas is over, and we have time to reflect, catch up on some readying, and maybe do a spot of coding just for fun!
In this article we will be creating a scrolltext widget from scratch, which is a good way to demonstrate how easy it is to write your own controls in QTX. It is a lot easier than under Delphi or Lazarus since the browser provides most of the functionality out of the box for you, and the QTX runtime library provides the rest.
So start a new visual project and add a new unit, we will be isolating our fancy new widget there.
Looking at the documentation
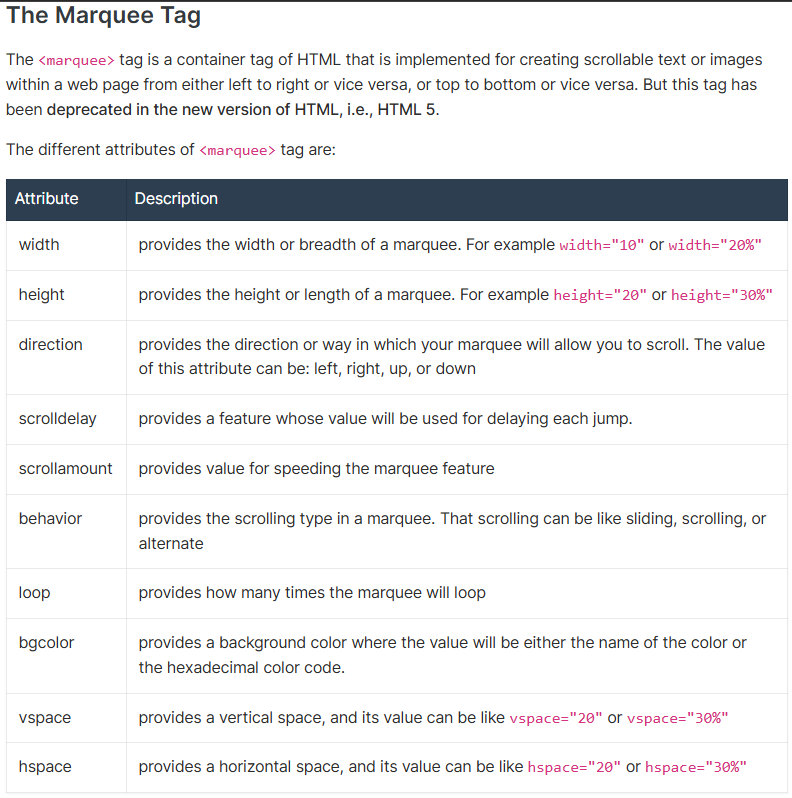
The DOM has an element that already does what we want, namely the marquee tag. This tag will scroll or slide text from right-to-left (e.g normal scrolltext). So our first stop is to look at the HTML documentation for that specific tag.
There are a lot of websites that maintains HTML documentation. I usually just google the tag i want to work with and read up on it first. In almost all cases W3Schools is a good place to start.
One thing worth noting when working with HTML elements, is that there are two types of properties. There are properties that you can adjust via CSS (such as width, height, border, background and similar) and then there are attributes. Attributes are usually defined via the tag itself, which is slightly different than how CSS properties are read and written to (poke around the RTL and look at the code for the other widgets is a good idea when learning the ropes!):
<marquee scrolldelay=16>
Note: Further down in the article we will be exposing attributes as pascal properties, and these are read and written somewhat different to standard html properties. This is often a case of confusion when you are just starting out, but it really is very simple. Just remember that there is a difference between HTML properties and HTML attributes and you will pick it up in no time!
Isolating enum types
Now that we have found the official HTML documentation for the element, I usually look for properties that I can turn into enums types. In the above overview two properties in particular stand out: direction and behavior. These properties are both string, which means we can use our enum as a simple index value into a pre-defined array. So let’s start by defining those!
Note: Notice that i added a “none” option at the start of each enum type. This is to allow for a state where nothing is set, and it’s also useful when we try to read properties from the live DOM at runtime. If we for some reason are unable to recognize a string from the DOM, we can fall back on sdNone or sbNone cleanly without fuzz.
To make life a little easier for ourselves (and make our code run faster) we will create two arrays that match these enum types. The idea here is, that you can use the ordinal value of the enum to get the correct string value – and likewise to lookup a string value and get the enum value. I usually refer to arrays like this as lookup tables.
Immediately beneath the implementation section, we define our lookup tables, and two helper functions to convert a string value back to an enum type. This is useful when we read values directly from the DOM at runtime.
var
sDirections: array [TQTXScrollDirection] of string = ('', 'left', 'up', 'down', 'right');
sBehavior: array[TQTXScrollBehavior] of string = ('', 'sliding', 'scrolling', 'alternate');
function StrToDirection(const Value: string): TQTXScrollDirection;
begin
var idx := sDirections.IndexOf( Value.Trim().ToLower());
if idx >= sDirections.Low() then
result := TQTXScrollDirection(idx);
end;
function StrToBehavior(const Value: string): TQTXScrollBehavior;
begin
var idx := sBehavior.IndexOf( Value.Trim().ToLower());
if idx >= sBehavior.Low() then
result := TQTXScrollBehavior(idx);
end;
Next, we need to define our own widget class. By default all TQTXWidget’s will create a DIV element, so the first thing we need to do is to change that. We want our widget to create a marquee element instead.
And further down in our implementation section of the unit we add the code for our new CreateElementInstance() method as such:
function TQTXScrolltext.CreateElementInstance: THandle;
begin
asm
@result = document.createElement("marquee");
end;
end;
Getter and setter logic
Values that you have applied to a visual control in QTX during design time (in the form designer or inspector) are always written to the widget as a part of the constructor callback (you can read about that in the documentation). This means that we need to cache values if the widget is not in “ready state”. This is more or less the exact same as you would do in Delphi.
At this point I want to include a couple of the other properties for the HTML element (delay and amount) which map more cleanly to integer values (no need for any lookup tables there).
With the definition in place, let’s get to the boring task of implementing the getter and setter methods!
function TQTXScrollText.GetDirection: TQTXScrollDirection;
begin
if WidgetState = wsReady then
result := StrToDirection( TQTXBrowser.ReadComputedStr(Handle, "direction") )
else
result := fDirection;
end;
procedure TQTXScrollText.SetDirection(const Value: TQTXScrollDirection);
begin
if WidgetState = wsReady then
Handle.direction := sDirections[ value ]
else
fDirection := value;
end;
function TQTXScrollText.GetBehavior: TQTXScrollBehavior;
begin
if WidgetState = wsReady then
result := StrToBehavior( TQTXBrowser.ReadComputedStr(Handle, "behavior") )
else
result := fBehavior;
end;
procedure TQTXScrollText.SetBehavior(const value: TQTXScrollBehavior);
begin
if WidgetState = wsReady then
Handle.behavior := sBehavior[ value ]
else
fBehavior := value;
end;
function TQTXScrollText.GetAmount: int32;
begin
if WidgetState = wsReady then
result := Attributes.AttributeRead("scrollamount")
else
result := fAmount;
end;
procedure TQTXScrollText.SetAmount(const Value: int32);
begin
if WidgetState = wsReady then
Attributes.AttributeWrite('scrollamount', value)
else
fAmount := value;
end;
function TQTXScrollText.GetDelay: int32;
begin
if WidgetState = wsReady then
result := Attributes.AttributeRead("scrolldelay")
else
result := fDelay;
end;
procedure TQTXScrollText.SetDelay(const Value: int32);
begin
if WidgetState = wsReady then
Attributes.AttributeWrite('scrolldelay', value)
else
fDelay := value;
end;
Scaffolding and stuff
You are probably wondering why there is no property for the, well, actual text that we will be scrolling? Well that is the fun part! The marquee element will scroll whatever text you have defined as it’s innerHTML property. And that property is already defined and published in TQTXWidget that we inherit from, so you dont really need to do anything for that.
While we do want a bit more code added, like our own constructor, and override the ApplyPropertyCache() method — lets just give it a spin first and see what we have so far!
Flip over to the tab for your mainform and add the following code to your constructor:
var lScroller := TQTXScrollText.Create( panel3, nil );
lScroller.Height := 32;
lScroller.Amount := 4;
lScroller.Behavior := TQTXScrollBehavior.sbScrolling;
lScroller.align := alBottom;
lScroller.InnerHtml := "<b>Welcome</b> to the fun and games of HTML controls!";
lScroller.ThemeBackground := TThemeBackground.bgDecorativeInverted;
lScroller.Font.Color := clWhite;
I added the blue gradient theme background purely so we can see the widget’s boundaries. As you can see below, it aligns neatly to the bottom of the form (I only took a small screengrab here, no point posting a large empty form).
Congratulations! You have now created your first visual QTX control! The next step is to do the typical organization for widgets that can be used by the form designer:
Rename the class to TQTXCustomScrolltext
Expose the HSpacing and VSpacing attrbutes
Define another class called TQTXScrolltext which defines the properties as published with default values. This allows you to inherit new widgets from TQTXCustomScrolltext and chose what properties you want to expose.
Override ApplyPropertyCache() which ensures that values set in the inspector is properly written to the underlying marquee element immediately after it reaches it’s ready-state.
Define a custom constructor for TQTXScrolltext, which the IDE needs to generate code that targets the widget specifically.
Add delegate definitions so standard delegate types can be added from the form designer
Here is the finished unit, ready for use. If you create a folder for it and add a filesource for that folder (see preferences window) the IDE will notice the attributes for the class and register it on your widget palette!
unit qtx.dom.control.scrolltext;
interface
uses
qtx.sysutils,
qtx.classes,
qtx.dom.types,
qtx.delegates,
qtx.dom.events,
qtx.dom.theme,
qtx.dom.events.mouse,
qtx.dom.events.pointer,
qtx.dom.events.keyboard,
qtx.dom.events.touch,
qtx.dom.widgets;
type
// Forward declarations
TQTXCustomScrolltext = class;
TQTXScrolltext = class;
// Enum types
TQTXScrollDirection = (sdNone = 0, sdLeft, sdUp, sdDown, sdRight);
TQTXScrollBehavior = (sbNone = 0, sbSliding, sbScrolling, sbAlternate);
// Base class that implements the Marquee element
TQTXCustomScrolltext = class( TQTXWidget )
private
fDirection: TQTXScrollDirection;
fBehavior: TQTXScrollBehavior;
fDelay: int32;
fAmount: int32;
fHSpace: int32;
fVSpace: int32;
protected
function GetDelay: int32; virtual;
procedure SetDelay(const Value: int32); virtual;
function GetAmount: int32; virtual;
procedure SetAmount(const Value: int32); virtual;
function GetDirection: TQTXScrollDirection; virtual;
procedure SetDirection(const value: TQTXScrollDirection); virtual;
function GetBehavior: TQTXScrollBehavior; virtual;
procedure SetBehavior(const value: TQTXScrollBehavior); virtual;
function GetHSpace: int32;
procedure SetHSpace(const Value: int32);
function GetVSpace: int32;
procedure SetVSpace(const Value: int32);
function CreateElementInstance: TWidgetHandle; override;
procedure ApplyPropertyCache; override;
end;
// Custom constructor
TQTXScrolltextConstructor = procedure (ScrollText: TQTXScrolltext);
[PropertyDialog('InnerHtml', dlgHTML)]
[PropertyDialog('InnerText', dlgTEXT)]
[PropertyDialog('Value', dlgTEXT)]
[RegisterInfo('Standard HTML5 Marquee scrolltext', 'qtx_ui_button.png')]
[RegisterWidget(pidBrowser, ccGeneral)]
[DefaultName('Scroller')]
[BindDelegates([
TQTXDOMMouseWheelDelegate,
TQTXDOMMouseClickDelegate,
TQTXDOMMouseDblClickDelegate,
TQTXDOMMouseEnterDelegate,
TQTXDOMMouseLeaveDelegate,
TQTXDOMMouseDownDelegate,
TQTXDOMMouseMoveDelegate,
TQTXDOMMouseUpDelegate,
TQTXDOMPointerLostCaptureDelegate,
TQTXDOMPointerGotCaptureDelegate,
TQTXDOMPointerUpDelegate,
TQTXDOMPointerMoveDelegate,
TQTXDOMPointerDownDelegate,
TQTXDOMPointerLeaveDelegate,
TQTXDOMPointerEnterDelegate,
TQTXDOMKeyboardPressDelegate,
TQTXDOMKeyboardUpDelegate,
TQTXDOMKeyboardDownDelegate,
TQTXDOMTouchStartDelegate,
TQTXDOMTouchEndDelegate,
TQTXDOMTouchMoveDelegate,
TQTXDOMTouchCancelDelegate
])]
TQTXScrolltext = class( TQTXCustomScrolltext )
public
constructor Create(AOwner: TQTXComponent; CB: TQTXScrolltextConstructor); reintroduce; virtual;
published
property Amount: int32 read GetAmount write SetAmount default 1;
property Delay: int32 read GetDelay write SetDelay default 1;
property Direction: TQTXScrollDirection read GetDirection write SetDirection default sdLeft;
property Behavior: TQTXScrollBehavior read GetBehavior write SetBehavior default sbScrolling;
property HSpace: int32 read GetHSpace write SetHSpace default 0;
property VSpace: int32 read GetVSpace write SetVSpace default 0;
end;
// Expose helper functions so anyone inheriting from TQTXCustomScrolltext
// can easily map values without having to expose the lookup tables
function StrToDirection(const Value: string): TQTXScrollDirection;
function StrToBehavior(const Value: string): TQTXScrollBehavior;
implementation
var
sDirections: array [TQTXScrollDirection] of string = ('', 'left', 'up', 'down', 'right');
sBehavior: array[TQTXScrollBehavior] of string = ('', 'sliding', 'scrolling', 'alternate');
function StrToDirection(const Value: string): TQTXScrollDirection;
begin
var idx := sDirections.IndexOf( Value.Trim().ToLower() );
if idx >= sDirections.Low() then
result := TQTXScrollDirection(idx);
end;
function StrToBehavior(const Value: string): TQTXScrollBehavior;
begin
var idx := sBehavior.IndexOf( Value.Trim().ToLower() );
if idx >= sBehavior.Low() then
result := TQTXScrollBehavior(idx);
end;
//#############################################################################
// TQTXScrolltext
//#############################################################################
constructor TQTXScrolltext.Create(AOwner: TQTXComponent; CB: TQTXScrolltextConstructor);
begin
inherited Create(AOwner, procedure (Widget: TQTXWidget)
begin
// This serves two purposes. We init the default values when creating
// the widget by code (not on a form design), and we endure that the
// HTML attrbutes are initialized before we read from them
Amount := 1;
Delay := 1;
Direction := sdLeft;
behavior := sbScrolling;
HSpace := 0;
VSpace := 0;
if assigned( CB ) then
CB( self );
end);
end;
//#############################################################################
// TQTXCustomScrolltext
//#############################################################################
function TQTXCustomScrolltext.CreateElementInstance: THandle;
begin
asm
@result = document.createElement("marquee");
end;
end;
procedure TQTXCustomScrolltext.ApplyPropertyCache;
begin
inherited;
SetAmount( fAmount );
SetDelay( fDelay );
SetDirection( fDirection );
SetBehavior( fBehavior );
SetHSpace( fHSpace );
SetVSpace( FVSpace );
end;
function TQTXCustomScrolltext.GetDirection: TQTXScrollDirection;
begin
if WidgetState = wsReady then
result := StrToDirection( TQTXBrowser.ReadComputedStr(Handle, "direction") )
else
result := fDirection;
end;
procedure TQTXCustomScrolltext.SetDirection(const Value: TQTXScrollDirection);
begin
if WidgetState = wsReady then
Handle.direction := sDirections[ value ]
else
fDirection := value;
end;
function TQTXCustomScrolltext.GetBehavior: TQTXScrollBehavior;
begin
if WidgetState = wsReady then
result := StrToBehavior( TQTXBrowser.ReadComputedStr(Handle, "behavior") )
else
result := fBehavior;
end;
procedure TQTXCustomScrolltext.SetBehavior(const value: TQTXScrollBehavior);
begin
if WidgetState = wsReady then
Handle.behavior := sBehavior[ value ]
else
fBehavior := value;
end;
function TQTXCustomScrolltext.GetHSpace: int32;
begin
if WidgetState = wsReady then
result := Attributes.AttributeRead("hspace")
else
result := fHSpace;
end;
procedure TQTXCustomScrolltext.SetHSpace(const Value: int32);
begin
if WidgetState = wsReady then
AttributeWrite('hspace', value)
else
fHSpace := value;
end;
function TQTXCustomScrolltext.GetVSpace: int32;
begin
if WidgetState = wsReady then
result := Attributes.AttributeRead("vspace")
else
result := fVSpace;
end;
procedure TQTXCustomScrolltext.SetVSpace(const Value: int32);
begin
if WidgetState = wsReady then
AttributeWrite('vspace', value)
else
fVSpace := value;
end;
function TQTXCustomScrolltext.GetAmount: int32;
begin
if WidgetState = wsReady then
result := Attributes.AttributeRead("scrollamount")
else
result := fAmount;
end;
procedure TQTXCustomScrolltext.SetAmount(const Value: int32);
begin
if WidgetState = wsReady then
AttributeWrite('scrollamount', value)
else
fAmount := value;
end;
function TQTXCustomScrolltext.GetDelay: int32;
begin
if WidgetState = wsReady then
result := Attributes.AttributeRead("scrolldelay")
else
result := fDelay;
end;
procedure TQTXCustomScrolltext.SetDelay(const Value: int32);
begin
if WidgetState = wsReady then
AttributeWrite('scrolldelay', value)
else
fDelay := value;
end;
end.
When creating websites or mobile applications there is always the issue of glyphs and button graphics. In the past couple of decades or so both Android and iOS have introduced standardized glyphs for buttons, lists and toolbars that are intuitive to understand and which has become somewhat universal. The same can be said for websites.
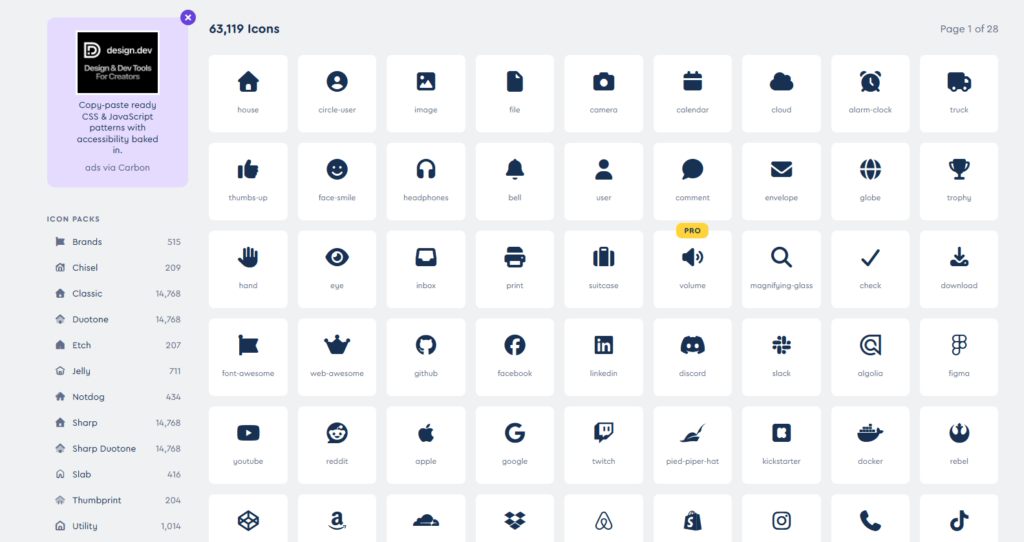
By using the same or similar glyphs in your applications you make it easier for users to navigate. It is here that we encounter Font-Awesome, which is actually nothing but a extremely well crafted CSS stylesheet. A stylesheet where all the glyphs you can possibly need are defined as SVG vector shapes (read: no pixel data involved).
Understanding Font-Awesome
In HTML you can assign just about anything as the background for an element. You can use a picture (like a jpg, png or gif), a slice of a picture, a single color, a gradient – or in the case of Font-Awesome: an SVG image which is based solely on vectors. This is the “awesome” part, namely that you have all the benefits of a scalable vector graphics, combined with the power of HTML. That is a knockout solution that really takes the grunt out of making user friendly and intuitive user interfaces.
With over 60,000 glyphs to choose from Font-Awesome have glyphs for every imagined scenario
It’s already a part of QTX
There is nothing elaborate you have to do in order to use Font-Awesome in Quartex Pascal. In fact, Font-Awesome is already referenced in the theme.css file of your project! So the browser loads it automatically whenever you start your application!
If you open up the theme.css file of your QTX application you will find the following two lines at the very top:
The default theme in QTX is based on the Ubuntu look and feel, hence the stylesheet instructs the browser to download the Ubuntu font (unless you have already installed it locally). So the first line instructs the browser to download the font file.
The second line instructs the browser to download the Font-Awesome library (version 6.4.2 in this case) and make all the amazing glyphs usable from your web application. In this case we are using the Cloudflare hosted version which loads in less than a second pretty much anywhere in the world (this is maintained by Font-Awesome, not us). You can download Font-Awesome locally if you like, but the distribution is quite large. And there really is no need for it, the browser will store it in the cache.
How to use it
Like mentioned above, the Font-Awesome glyphs are basically vector backgrounds that can be applied to anything. But the standard syntax for a glyph is through the <i> tag (which is a text formatting tag for turning a piece of text italic). This is a little trick they use to get the glyph in there through ordinary CSS rules. However, the <i> tag is immediately closed with </i>, which means it doesnt actually cause any formatting changes to your text. Here is a typical example:
When rendered it looks like this:
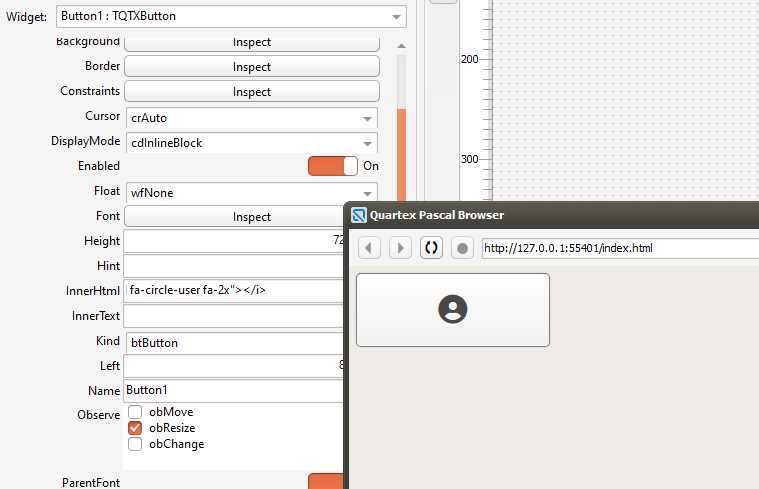
In Quartex Pascal you can use this anywhere you like, such as the innerHTML property of a button. Drop a button on a form, set the background and border style to button, then insert the following text into the InnerHTML type:
<i class="fa-solid fa-circle-user fa-2x"></i>
InnerHTML is a property that represents the entire content of an element, for a button this is the caption
Different sizes
You probably noticed that the <i> tag I used here contained the strange text “fa-2x” at the end? Well, that tells Font-Awesome that you want to use the larger size glyphs. By default the glyph size is quite small (good for list items and such).
There are a number of sizes you can choose from:
fa-xs — extra small
fa-sm — small
fa-lg — ~33% larger
fa-xl — extra large
fa-2xl — 2x larger
fa-2x up to fa-10x — even bigger (literal multipliers, great for standalone large icons)
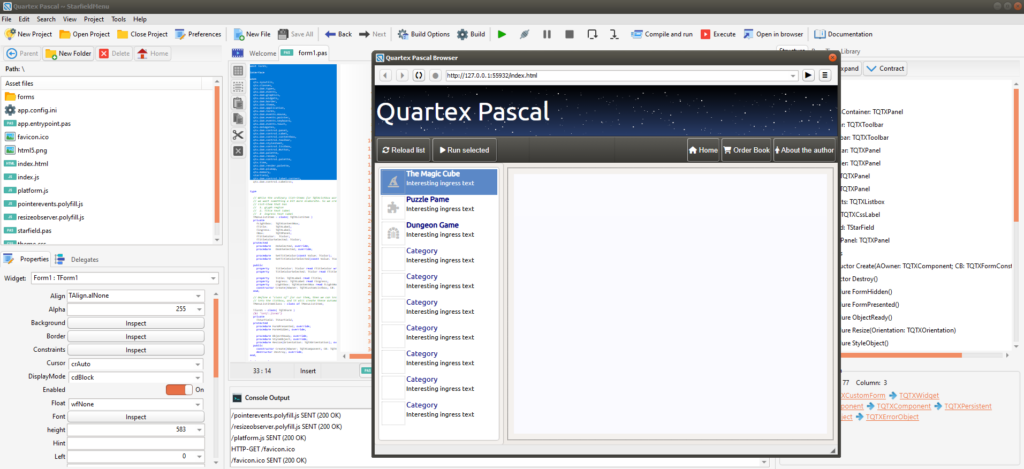
If you open up the StarMenu example you can see how I have used them to make a toolbar look more natural. I have also used them as glyphs for list items. Details like this matter when writing web applications – and they matter even more if you create mobile apps!
The StarMenu example demonstrates how to use Font-Awesome to spice up and otherwise static layout
We have two new widgets in the RTL this week! Namely TQTXTable and TQTXStringGrid which does exactly what you think they do.
Being able to quickly display a structured table of information is easy in HTML, but there has been a lot of changes to the old <table> tag that we all know from older HTML. Starting with HTML5 a table is no longer just a set of rows and columns, you can also define a separate header and footer.
TQTXTable
While it was tempting to jump straight into making a database grid, we decided we had to start with the basics, namely with full encapsulation of the table tag and its sub structures. This also involves expected behavior and various options to simplify usage from a programming point of view.
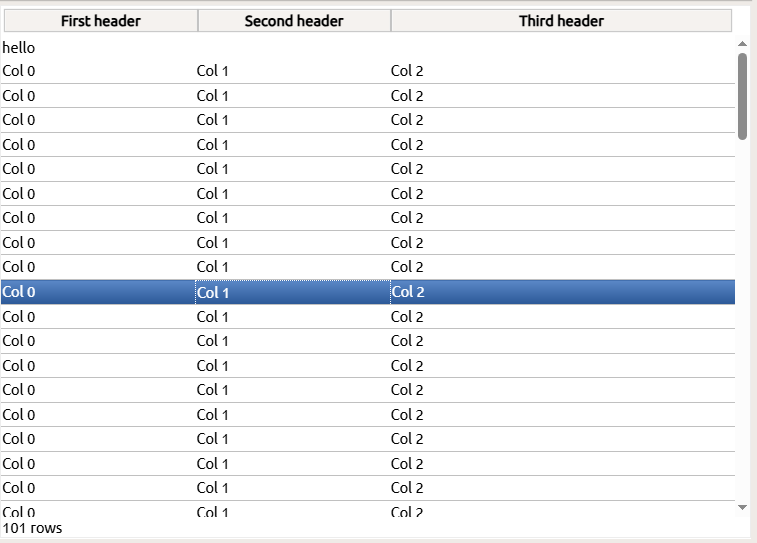
Simple table with header, body and footer
Sections
TQTXTable manages three sections which represents the header, body and footer elements. You can mix and match which of these you need, and its perfectly ok to just have a body, or a footer, or any combination of the three.
Rows and Columns
Each section can have as many rows as you like, who in turn can have any number of cells. There is no strict regime that forces your rows to have the same layout as your header by default.
Neat options
Since most use-cases will involve a header, and rows that match the layout of the header, we have exposed an option [tcFitBody] that will auto size the columns in the body section – so that it matches the layout of the header.
The same option also calculates the height of each section and makes sure the body section doesnt go beyond the <table> boundaries. If you also have the [tcScrollY] setting set, this results in the vertical scrollbar appearing.
The following options can be set:
tcScrollY
tcScrollX
tcFitBody
tcEditCells
tcColSelect
rcRowSelect
TQTXTable exposes ample methods that you can override to capture mouse and pointer interaction, both with cells and rows. You can also define what css style each row and cell should have by default, and which styles should be added when they are selected. This makes it easy to use your own css styles uniformly for all the rows and columns in your table.
You can also add event-handlers for row and column selection and do special colors changes or style changes if you like. All elements of the table are full TQTXWidgets so you have the full might of the RTL to throw at it, including animations if you like.
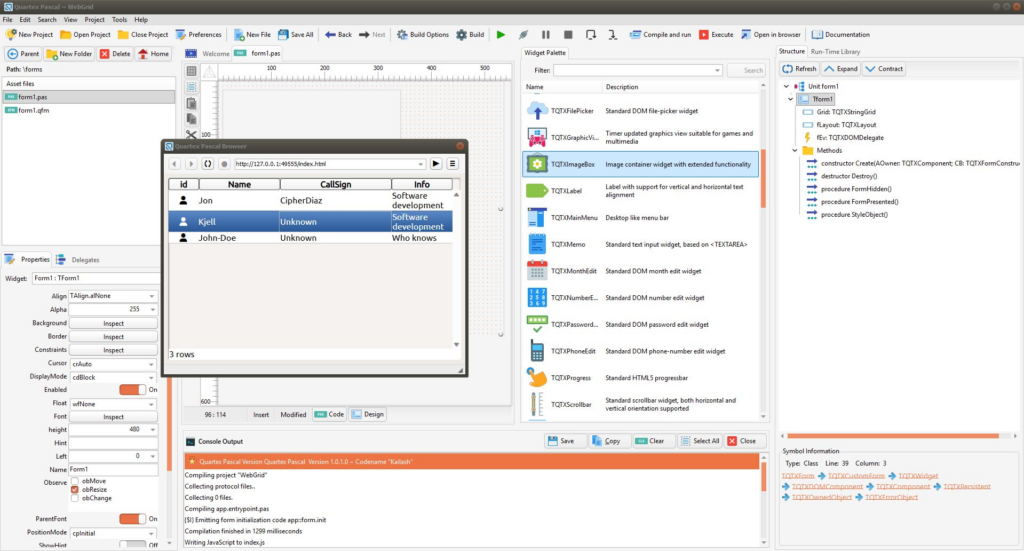
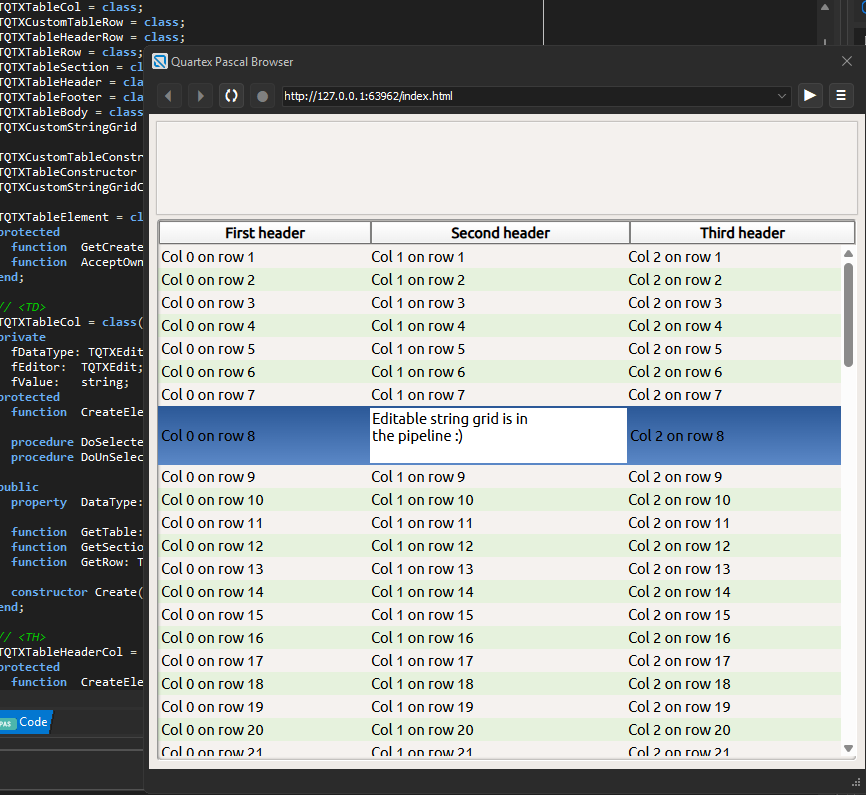
TQTXStringGrid
Inheriting from TQTXTable, TQTXStringGrid takes it one step further and adds cell editing. Here you can double-click on a cell (or double tap if you are on a tablet or phone) to enter edit mode.
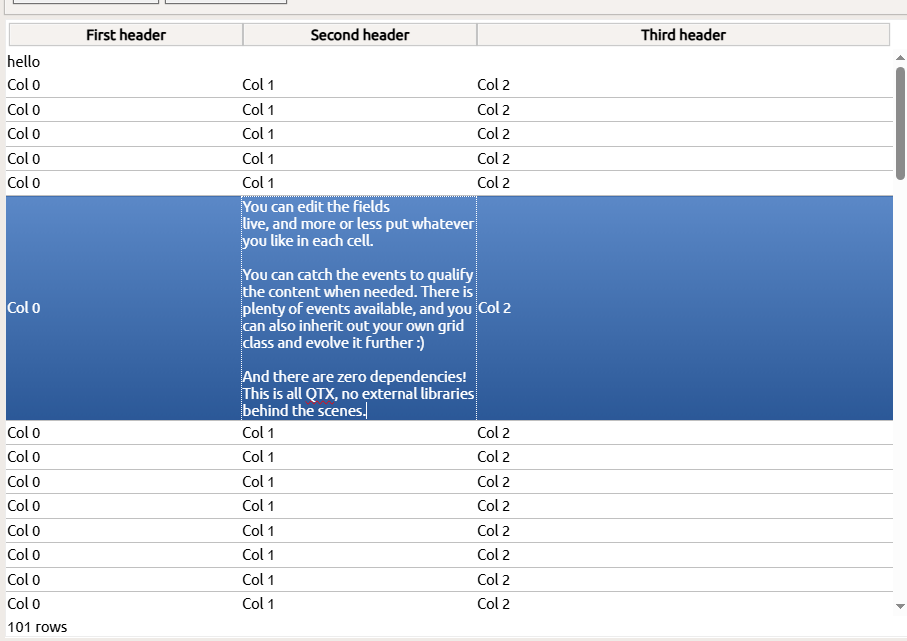
Live editing right in the grid cell
For full browsers there is also keyboard support, where pressing ESC cancel your current edit and replaces the cell content with it’s original value (standard behavior).
You can also programmatically trigger editing via EditEnter(), and also cancel any edit operation via EditEnd( cancel: boolean ).
TQTXStringGrid implements basic editing behavior which is intrinsic to the browser, but we have augmented it quite a lot. So it’s a nice way to get a fully functional StringGrid on the web.
Future grids?
We already have the methods in place that will enable database driven table browsing, but we need to get non-visual components in place first. We dont want to rush this, so we provide the non-database driven components first.
When the time comes that we have the database layer in place, we will return to this and made a proper grid that takes height for field datatype and offer different editors depending on field type.
Availability
The new components will be in the RTL package in the next update!
Following the feedback of our users and backers we have issued a second hotfix which irons out a few issues here and there, most notably the license provisioning issue during startup.
As with all products of this complexity there are bound to be things that can be polished and made better – and we intend to do just that! Updates will be frequent and we fix bugs or mistakes as quickly as they are discovered and reported.
Machine signature
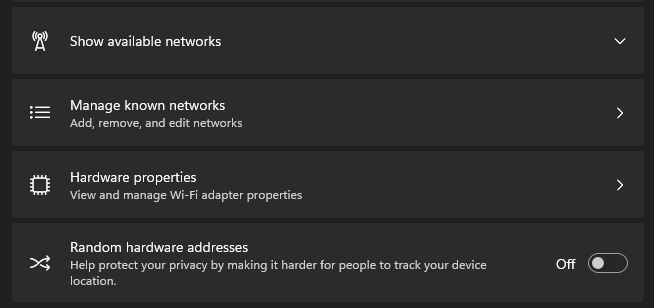
The reason the license provisioning dialog appeared often during startup despite the machine being provisioned already, was due to a relatively new Microsoft Windows feature called randomize hardware addresses (under Network & Internet / Wi-Fi). When this is enabled for a network connection (which is the default behavior) Windows will create a fake mac-address in an attempt to help prevent tracking.
The IDE now queries the actual mac-address specifically and is unaffected by random addresses
This randomization sadly affected hardware signature queries and traditional WinAPI calls, with random results every time the IDE performed a validity check. This has now been fixed and the IDE queries WMI for the actual address, which remains static unless the adapter is disabled.
Reloading packages
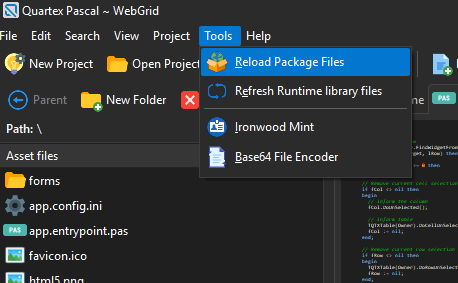
Due to the above case where the machine signature was affected, the IDE would prompt you to download packages again – even if they were already there. This will be ironed out by our next update. All you have to do is click cancel when the download window appears, then go to the main menu and select Tools > Reload Package Files to manually trigger a normal reload. Followed by Tools > Refresh runtime library files.
This is not something you need to do often, it became more visible than it should due to the hardware signature issue triggering the provisioning logic.
Triggering a manual reload of packages can be done via the Tool menu
Upcoming widgets
Our users have requested a string-grid and database-grid more akin to what they are used to under Delphi and Lazarus. We agree, and have already started on a more friendly drag & drop grid that can be easily styled, inherited from and used in a variety of ways.
The initial grid that has been in the RTL for some time was initially created to display map tiles and/or other graphically heavy elements. It has the benefit of using CSS that triggers the GPU to move things around at 60 fps – but at the cost of complexity and knowing HTML5 and CSS in-depth.
The old grid class will still be there, but we will deprecate it in favor of the new one. We didn’t have time to get the new grid into the RTL this update (read: hotfix), but it will be available in the next!
Other changes and fixes
Name qualifier was enabled for for some string properties in the inspector, causing the IDE to mistake it for a name property (identifier). A rare edge case which for the most part went unnoticed
An exception that occurred when deleting a group of widgets from a form design
Added support for HTTPS and ordinary certificates for nodejs
Added support for REST routing for HTTP/S
Added MariaDB example which demonstrates database creation, querying and REST routing – as well as connection pooling
Expanded the IDE’s back and next functionality, it now behaves more or less identical to Delphi and Lazarus
Fixed a bug in the property inspector where, if you scrolled to the bottom and then resized the inspector – it would not recalculate the position correctly
Removed legacy polyfill files (resizeobserver.polyfill.js and pointerevents.polyfill.js) from project templates
Updated Simple2D project template
Fixed a small issue with the New Form IDE function, which did not set displaymode and positionmode (plain copy from the template)
Went over the nodejs templates and fixed a constructor issue
Added missing menu items for lookup forms and lookup units
Fixed a mistake in TQTXOrmObject’s constructor and SetChanged() methods in qtx.orm.pas
Fixed an issue with package download where a dependency was downloaded despite already existing on the filesystem
Updated a declaration bug in the Phaser library where fields were marked as external, but the syntax difference between field and property was not correct
Fixed missing constructors in older Ragnarok units which used InitializeObject() and FinalizeObject(). These files are not yet used by the ragnarok code generator and thus flew under the radar
Fixed warnings and hints in the RTL. Mostly hints about case differences in the uses clause. Insignificant but still good to get rid of
Improved compiler message delegation internally in the IDE
Fixed a bug where the create-date in project files were not updated from local date/time format to ISO80601
Fixed a mistake in the build-process where some exception types were ignored that should be delegated to the console output
Updated examples that needed some love, especially the websocket examples
Updated the IDE’s internal interface parser to support external named fields for external class types
Started on our upcoming “live rendering” of HTML for the form designer ..